Hey everyone,
Bit of an update. It's been a very long time as I'm sure you know. I've been pretty busy with school and a job, (I also got a cat!) but basically I had no inspiration to write about beauty. I love reviewing products and I love makeup, but I got a bit bored of writing about it. I think it might be something that's coming back to me. I can't promise 3 posts a week, but I think I'm going to aim for one good post each week. More if I feel like it. I hope that's okay with everyone. I better get writing.
Thanks for continuing to read- even though I've been away for so long.
Have an awesome day, whatever you're doing.
Megan

Sunday, 6 December 2015
Friday, 9 October 2015
Halloween Series #4: Queen of Hearts
Hey everyone!

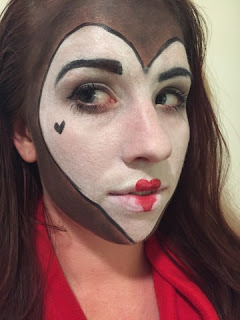


Today's look is a Queen of Hearts inspired one and I did it on my lovely friend, Sara. I hope you enjoy!

To begin I used a white face paint to outline the heart and filled it in. I then outlined it with a black liner and coloured the outside of her face in with a charcoal grey shadow. If I had black facepaint, I would have used that instead.

For the eyes I used some grey in the crease of the eye and a little bit of winged liner. I piled loads of mascara on and made her brows much darker and fuller.

For the lips I used a red liquid lipstick and drew a heart shape onto the lips, making sure the rest of the lip was white.

Finally, I added a black beauty spot in a heart shape on her left cheek.
I hope you enjoyed this look! It's really quick and easy and can be done with most makeup you have at home, or with very limited Halloween face paint!
Thanks for reading,
Megan
Wednesday, 7 October 2015
Halloween Series #3: Ice Queen
Hey everyone!


Today's post features one of my best friends, Jess, and I decided to borrow her face and turn her into an Ice Princess/Queen/regular ice girl, I dunno. I figured the "Frozen" phase is passing slightly, so it's safe for me to do this without it being interpreted as an Anna or Elsa look.

I started with a really pale base and lots and lots of highlighter. I wanted her skin to be luminous, but bordering on shiny. I used blue eyeshadows with metallic finishes to put on the eyes, and I also took it around her hairline and contoured with them as well. I also added some snowflakes with a blue liquid liner and buffed over them with more highlighter and glitter.

I went over Jess' brows with a white eyeshadow pencil to give them a frosty look, and I also did this over the lips but applied some blue and purple shadows over top for a frostbitten effect.

For some finishing touches I used a white mascara and some purple on the lower lashline.
I hope you enjoyed this look!
Thanks for reading,
Megan
Monday, 5 October 2015
Halloween Series #2: Shattered Skin
Hey everyone,


Today it's Halloween Series post #2! I've tried to create a look that makes it seem as though my face has been shattered. Inspired by my friend, Sara, who recently shattered her iPhone (sorry). Thanks for inspiring dude! Hope you enjoy!!

I kept the base really simple for this look with no extra colour other than my foundation.

I used a black eyeliner to create a central point on my forehead and then I went from there.

I went over the black liner with some matte eyeshadow and tried to highlight with some white liner, but to be honest I liked it better with no highlight. I really love how it turned out, and I think after some practice it's quite a simple look to recreate with makeup most people will already have.

Here's the before and after shot!
Thanks for reading!
Megan
Friday, 2 October 2015
Halloween Series #1: Big Cat
Hey everyone,


Today's post is the first of many- some of my favourite looks to create and the ones I get the best feedback on. I hope you enjoy look number one, the Big Cat.

I started with a shimmering base topped with a darker foundation than my skintone.

I then added dimension by using bronzer on the outer edges of my face and contouring my nose and cheekbones with a matte brown shade.

I added a bronze eyecolour all over the lid and lined my eyes with black liner to create a cat-eye effect.

I added the spots all over, outlining with a black liner and then filling in with various matte and shimmery golds and bronzes. I also added the lip and nose with black cream shadow, but you could always skip this and go for a nude lip.

I've decided to do this at the end of every Halloween look to demonstrate the power of makeup!
Thanks for reading,
Megan
Wednesday, 16 September 2015
Sephora VIB Rouge
Hey guys!
Today I'm writing about the little box of goodies you get when you've obviously spent too much money at Sephora. I have to say, I felt more guilt than joy when I received this package, but it is a nice touch and a small gift exclusive for the level VIB Rouge.

It comes in a little red cardboard box.

Inside is a small pamphlet explaining the perks of VIB Rouge (free shipping on all orders, invites to exclusive events, access to products as soon as they release before they're available to the general public etc.)

You also get free, unlimited access to the Beauty Studio, so, essentially free makeovers whenever you wander past a Sephora. They're counting on us to buy all the products they use, of course.

And then, saving the best 'till last- a miniature, exclusive VIB Rouge shade of Marc Jacobs lipstick in a special red case.

A full size Marc Jacobs lipstick will set you back $38.00, so this is a nice little present. You can purchase a full size of the VIB Rouge shade- only if you are at a VIB Rouge status.

It's a pretty standard, classic red with a very creamy, pigmented formula.

This was just one swipe. I thought the texture was really nice, very smooth, almost gel like.

In bright daylight the shade is a very bright classic, cherry red, but in normal lighting it's a bit more plummy and neutral. Overall, a really nice wearable red.
So thats my review on the VIB Rouge Welcome Kit! I hope you enjoyed this post!
Thanks for reading!
Megan
Monday, 14 September 2015
Bite Beauty Bellini Review
Hey guys!
It's been a while since I've posted lately, and I've been in a bit of a blogging rut. I've still been trying out loads of new products and trying to keep on top of new releases, but for some reason coming back to school and moving in took up a lot of time and energy, I hope you understand!
Today I'm writing about a 250 Point Perk from Sephora, a new promotion they are doing with Bite Beauty. August's shade is "Bellini", a bright pink perfect for the end of summer. Here's what I thought!

I think the packaging is really nice and pretty informative for customers new to Bite Beauty.

Bite is definitely becoming more popular, and this makes me super happy because I've loved them for years now!

In the box you get a miniature lipstick, mini lipgloss and a little mirror that matches.

The lipstick is very creamy and pigmented (but be careful because Bite products melt very easily!) and the gloss is also lovely. It has a nice scent and is very pigmented and glossy- without being sticky.
I hope you all enjoyed this post!
Thanks for reading!
Megan
Friday, 28 August 2015
French Manicure Sticker Test
Hey everyone!
Firstly- sorry this is going up late! Thought I had scheduled it but must have forgotten to hit publish or some other important button! Hope you enjoy this post!

Recently I tried out the method of using binder stickers to create the perfect French manicure. I used Essie's "Blanc" as the white shade, and regular binder stickers.

I pressed one onto each of my nails, and tried to layer two on my thumb because it was too wide. Layering two did not work out very well because it meant that the tip wasn't very rounded or even and instead had a pointed centre.

When painted with the binder stickers still on everything looks good to go. Unfortunately, this wasn't the case for very long.

I peeled them all off- very carefully- and I just think it looks quite messy. Perhaps if I had peeled them off sooner so that they weren't as goopy, or maybe if I had waited until it was more dry, I'm not sure. Personally, I think I'd have better luck painting free hand, and that's not bragging, my very unsteady hand creates better lines than these stickers. Plus it's less wasteful.
So there's my negative review of using binder stickers for French manicure nail art. My advice is to just practice free hand and hope that practice makes perfect. Personally, it's not worth spending money on the stickers unless you use them in your binder, and it's not worth the waste.
Thanks for reading!
Megan
Wednesday, 26 August 2015
Clinique Moisture Favourites
Hey everyone!


Today I'm doing a quick review of a mini set I picked up from Sephora online. It's a set of three best selling Clinique products, 2 out of 3 I already own and love and wanted the miniatured for travelling.
They are all deluxe samples and I think a set like this is really great if you want to try some products out, without spending money on a full sized item.

Classic, simple Clinique packaging, which makes it pretty clear what to expect inside. This set comes with a Moisture Surge Extended Thirst Relief moisturizer, a Chubby Stick lip balm in the shade Super Strawberry, and a Moisture Surge overnight mask.

Here you can see that the sizes are quite good and perfect for travelling.

The Chubby Stick was the only item I hadn't already tried and so far I quite like it. It is relatively long lasting for a balm, and quite pigmented.

It isn't as glossy as I had imagined, but has a balmy sheen.

This is with one layer, but I have found that it builds up to a more pigmented shade if you reapply.
Thanks for reading!
Megan
Monday, 24 August 2015
MakeUpForEver Concealer Palette Review
Hey everyone!
Today I'm reviewing the MAKE UP FOR EVER "5 Camouflage Cream Palette". I bought this from Sephora in shade No. 1. I've only been using it for a few days but I think I've gotten used to how I should apply it and how I like to use it. I hope you enjoy this review!


Today I'm reviewing the MAKE UP FOR EVER "5 Camouflage Cream Palette". I bought this from Sephora in shade No. 1. I've only been using it for a few days but I think I've gotten used to how I should apply it and how I like to use it. I hope you enjoy this review!

First off, the package is pretty simple. I really like the sleek size and thickness of it, it's designed for professional makeup artists, so it has a slender design for a purpose. I think this makes it easier to carry in any makeup bag and not just a pro kit.

I also love the 5 shade selection versus a massive concealer palette of 15+ shades. It's much more reasonable for personal use and is far less intimidating to a makeup lover rather than a makeup artist.

The packaging isn't just slim and easy to carry, it's also very lightweight and easy to see. The clear lid makes it easy to grab, especially if you own any of the other shades, and it's so lightweight that it's perfect for travelling- which makes sense because your concealer colour may change depending on the destination.

The concealers themselves are very buttery and creamy. The palest shade is especially creamy, which is nice because I often use this under my eyes or as a highlight. The rest still blend wonderfully, but I think they get creamier with more use. The pigmentation is also wonderful. These concealers are high coverage, but can be blended out to make them less so. For fuller coverage I like to use these best with my fingers, and then buffed in with a beauty blender, I think brushes aren't the best option for these products.

Overall, I really love this palette. It's versatile, pigmented, blendable and most importantly- portable.
I couldn't recommend this enough.
Thanks for reading!
Megan
Friday, 21 August 2015
Travel Diaries: Tobermory, Ontario
Hey everyone,
Todays Travel Diaries post is one a little closer to home in Tobermory, Ontario. It's about a three hour drive from where I live, driving on only two roads the entire time heading almost directly North. My friends and I had wanted to plan a camping trip for some time, but must have waited too long to book it because we could only get one night at the Bruce Peninsula National Park. Here's what we got up to in the short amount of time that we were there!


Todays Travel Diaries post is one a little closer to home in Tobermory, Ontario. It's about a three hour drive from where I live, driving on only two roads the entire time heading almost directly North. My friends and I had wanted to plan a camping trip for some time, but must have waited too long to book it because we could only get one night at the Bruce Peninsula National Park. Here's what we got up to in the short amount of time that we were there!

We started off our trip leaving early in the morning and stopping at a Tim Hortons for some breakfast. My breakfast included a powdered donut and a large cup of tea. My friends got slightly more sensible options, but it was a good start to the day.

We didn't stop at all while driving, but it was a relatively short drive and the scenery was beautiful. Here's the first picture we took upon arrival- this was a 2 minute walk from our site!

Of course we wanted to document it, so here we are laughing about something on the edge of Cyprus lake.

And here's how happy I was to be out of the car and starting my mini vacation!

We put up the tent and got in, looking pretty proud of ourselves and getting excited for a swim!

The water was beautiful. It was freezing, but beautiful.

We all swam, rockclimbed, and visited The Grotto which was incredible. I didn't document it because I didn't want to drop my phone into the crystal clear water, or down 'the chimney', which was a narrow hole in the rocks which I reluctantly climbed both up and down.

Here we are after the hike to the Grotto, enjoying a little rest.

And this was taken at the end of the night, after visiting Tobermory for dinner and enjoying some icecream.
I would definitely revisit Tobermory and the Bruce Peninsula National Park anyday! I would love to stay for longer and really enjoy swimming in the beautiful Cyprus Lake. It was well worth visiting and I'm sure I'll be back!
Thanks for reading!
Megan
Subscribe to:
Posts (Atom)