Tuesday 29 April 2014

My Eyebrow Routine

Eyebrows are a really important feature on anybody's face. Females, in particular, have to go through all sorts of crazy routines to get them looking perfect, from plucking and waxing to dyeing and even tattooing. I think eyebrows really frame the face, but I don't do anything too wild. Here is what I do from start to finish!

BEFORE MAKEUP:
 I use Tweezerman tweezers to pluck any hairs that I don't want. I always use a spooley to brush the hairs first so that I don't take any out that keep the shape of my brow.
 A good way to tell where your brows should be is to follow these next 3 steps. First, line a brush or pencil at the edge of your nostril and point upwards. This should guide where your brow should begin.
 Secondly, by lining your nostril with the edge of your iris you can determine a good place for the arch of your brow. Make sure you look straight ahead for this step, otherwise you could take too much away at the wrong area of your brow. Of course this step depends on whether you have a brow arch or not- always stick with your natural brow shape first. Less plucking is better, and a lot less painful! 
 Finally, use your nostril and outer corner of your eye to see where the tail of your eyebrow should end. This can also depend on your face shape and personal taste, my brows never go past this point, but some people prefer a long brow tail (just look at Audrey Hepburn!)
 I always use a spooley (brow comb/brush) to comb my brow hairs up. My eyebrows are very sparse and sometimes longer hairs and point downwards and create bald patches in my eyebrows. 
To fix this, every month or so I comb my brows up and trim anything that goes too far above the highest point of my brow. I never, ever do this to the tail of my brow because I don't have much hair there and longer hairs give the illusion of a fuller brow tail. 

TO FILL MY BROWS:
 Here is the mess of eyebrow products I own, not something I'm particularly proud of.
 My current favourite amongst brow products is Anastasia Beverly Hills "Brow Wiz". I have the shade Blonde Ash, a tone that isn't too red (an issue most brow pencils have). It has a medium texture, meaning it isn't too soft that it leaves chunks of products in your brows, and it isn't too hard that it hurts to apply or leaves really harsh lines. 
 The applicator is perfect, it has a very tiny nib which really mimics what hairs look like. It can fill in your brows in a very natural looking way. 
 Also- huge bonus- there is a spooley on the other side of the brush which is perfect for brushing out any harsh lines or for when you travel!
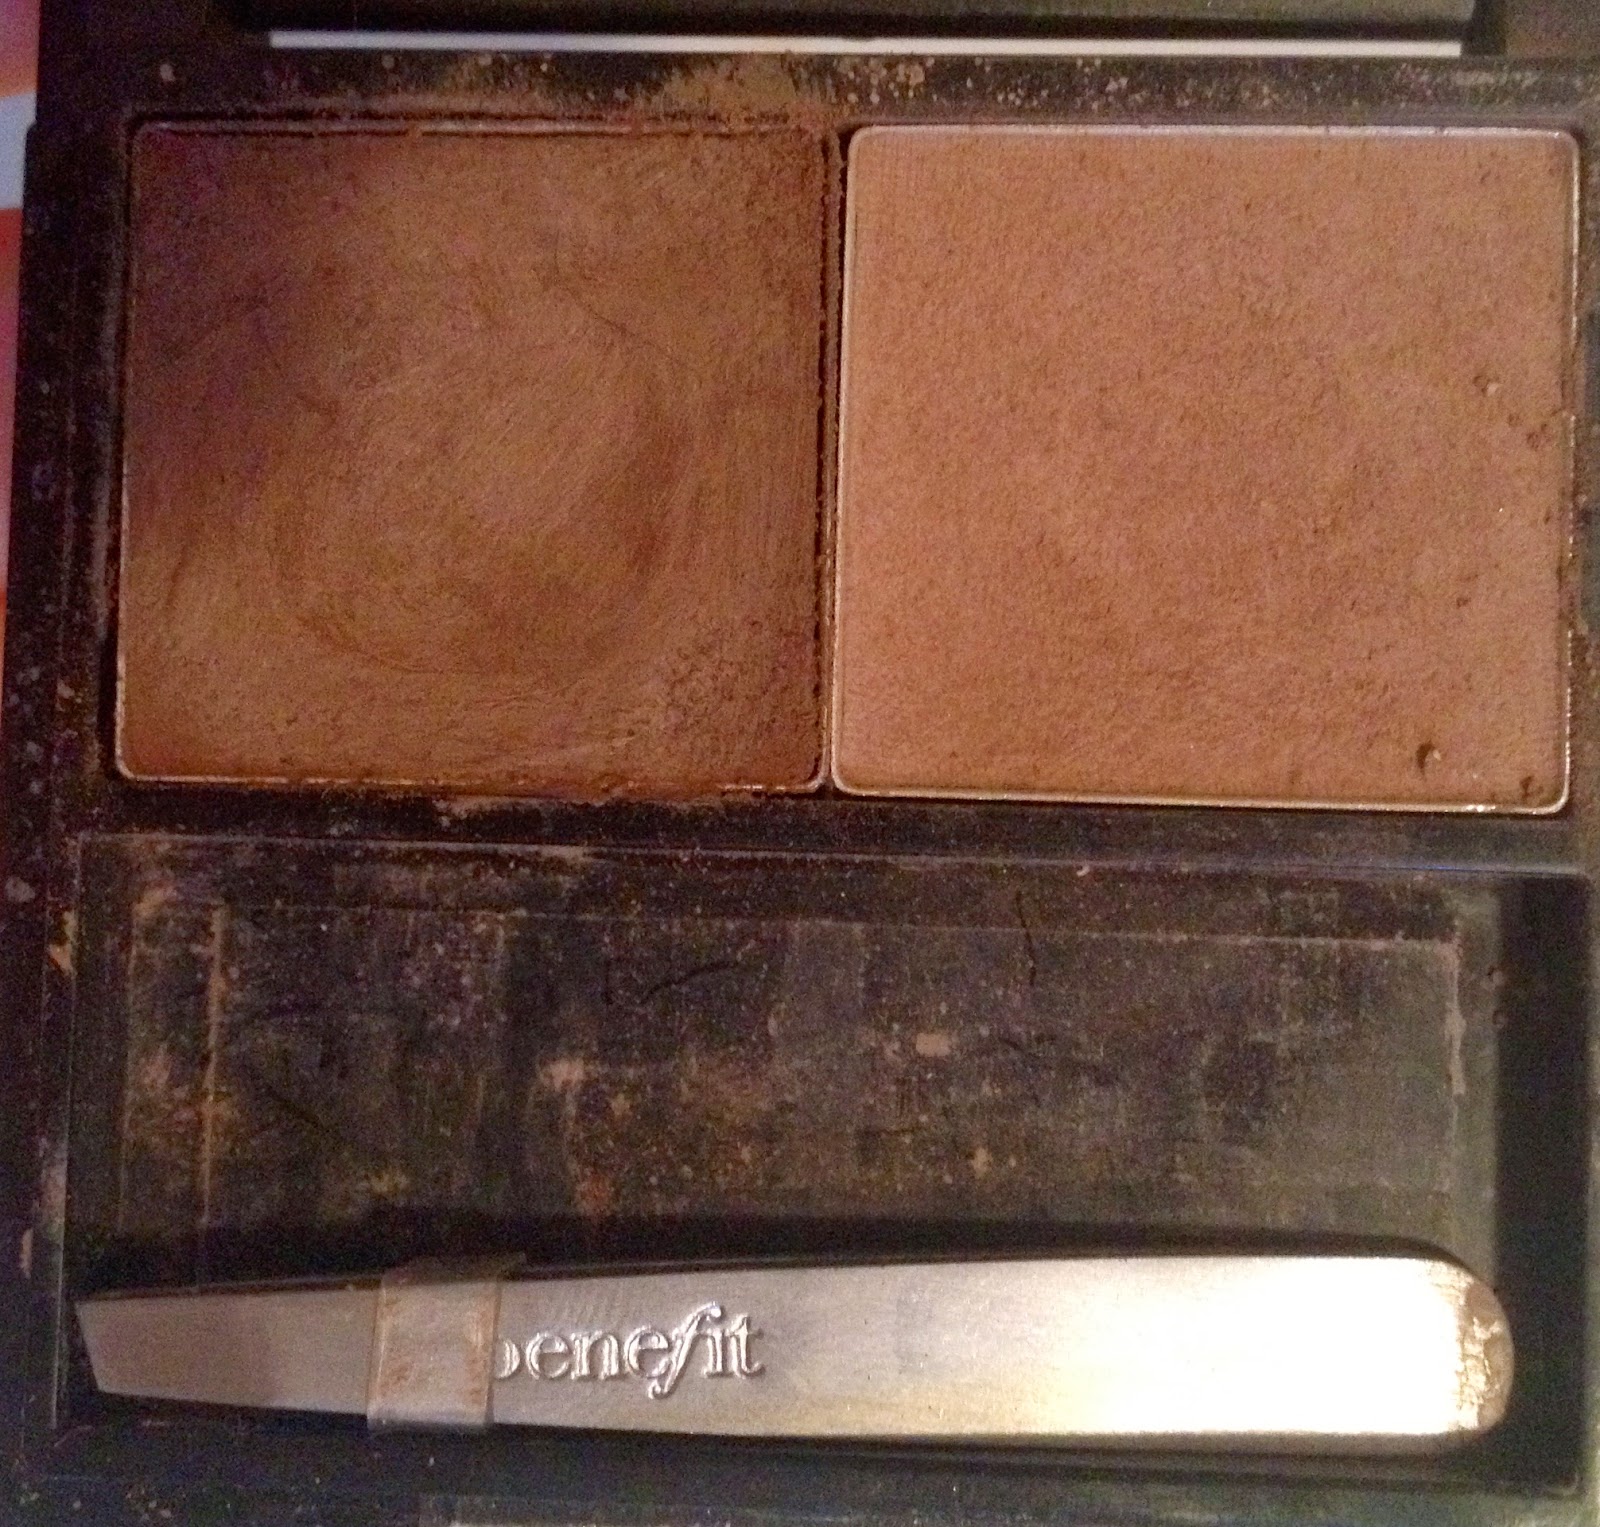
 Benefit's Brow Zings was the only brow product I used for a really long time. It has a tinted wax (left) and a brow powder (right). It also came with two mini brow brushes and miniature tweezers (which really aren't bad!) The wax is a bit too dark for me, but does hold your brows in place for a very long time. It says to use the wax and then the powder, I never did that because I found the powder really clung to the wax and created dark chunks in your eyebrows. Generally, I just use the powder on an angled eyeliner/brow brush to create a fuller brow look.
 Sometimes, on a long day, I set my brows with a clear gel mascara. You can use any brand, this is about $2.00 from Essence. You could also spray hairspray onto a spooley and use that if you're in a pinch, but clear mascara generally does the trick.
 To brighten and highlight the arch of my brow, I use Smashbox's "Eye Beam Double-Ended Brightner" which has one end for inner corners of your eye and your brow bone, and another end to brighten your lower lashline. 
 I use the thicker, creamy end of the pencil to draw directly under the outer half of my brow (right under the arch and tail). It makes the arch appear higher and gives the illusion that your eyebrow has more shape. It's a great way to make you appear more put together and awake. 

MY ROUTINE:
To begin I underline my brow with my brow pencil
 I then go around my entire brow to map out how I want them to look. It looks quite scary at first, but it works out when they're filled in.
 Here you can see the massive difference one eyebrow filled in makes. It's quite ridiculous actually.
 I took this next picture just to illustrate the difference in my eyebrow shapes. Remember that eyebrows are not identical, sometimes the shapes are different, the arches or length change, or even the colour of the brows themselves. 

I hope you enjoyed this extremely long post and found it helpful!
Have a great day, whatever you're doing! 

Sunday 27 April 2014

The Body Shop's Vitamin E Moisture Serum Review

Hey everyone,

Today I'm reviewing the Vitamin E Moisture Serum. It's $22.00 for 30ml. It's a gel formula which absorbs really quickly. Typically I apply this in the morning underneath my moisturizer, after cleansing. I use one full pump and apply it all over my face.

The Body Shop's Website describes the Vitamin E Moisture Serum as:
 "This pre-moisturiser provides intensive, continuous hydration and protection."

PROS:
- Awesome packaging, you can see how much product you have left and one pump is the perfect amount for application
- The gel absorbs quickly and isn't sticky
- It doesn't leave your skin looking shiny
- Applies well underneath moisturizer and makeup
- I've seen a definite difference in my skin and think it has improved the results of my moisturizer

CONS:
- The smell is the same baby diaper cream smell as the Vitamin E Serum-In-Oil, but doesn't last on the skin and you can only smell it briefly on application

I hope you enjoyed this review, I would really recommend this product!! Have a great day!

Friday 25 April 2014

FOTD 4: Date Night

Hey everyone,
Today I thought I'd do a Face Of The Day tutorial because I'm actually going out on a date! Woo! My boyfriend and I live together during the school year, but now exams are done so we're back with our parents while we work this summer. Being a student is expensive, so going out on dates isn't always practical. I wanted to put some effort in since it's been a while, and we're always so busy during the summer, making the end of spring a perfect time to go out before things get crazy again!
 To begin I primed with "that gal" by Benefit, a pink, brightening primer.
 I then used the Stila "Stay All Day" foundation in 01 Bare all over and touched up any redness with the concealer in the lid.
 Then under my eyes I applied the Maybelline Instant Age Rewind concealer, one of my all time favourites!
 I powdered my T-Zone and chin with the MAC Mineralize Skinfinish Natural in Light Plus.
 I then applied Maybelline's Master Glaze cream blush stick in 202 Barely Pink.
 I used The Body Shop's Bronzing Powder in 01 Light Matte all over for a bit of colour.
 As usual I filled in my sparse brows with Anastasia's Brow Wiz in Ash Blonde. 
 I used Walk of Shame, Foxy, Naked 2 and Venus from the Naked Basics palette to create a simple eye look with a bit of dimension.
 I then used the Rimmel Scandaleyes Thick & Thin eyeliner in black to create a classic, winged liner effect.
 I then coated my lashes with Covergirls Clump Crusher mascara.
 I applied Bourjois Sweet Kiss lipstick in Rose Talk, it's a pretty mauve-pink perfect for the transition into summer!
Finally I wanted to add some gloss so I applied Rimmel's Vinyl Gloss in 190 Pin Up, a very pretty bright pink.
 Finally some selfies to show how it looked. I really like the bright pink lip, it isn't too bold and i think it's perfect for spring.
And here is more of a close-up shot showing the eyeliner and lips.

I hope you all had a lovely day!
Woo! Date nights!

Wednesday 23 April 2014

The Body Shop Vitamin E Serum-In-Oil Review

Hey guys!

Today I'm reviewing the Body Shop's Vitamin E Serum-In-Oil. I purhcased it about a month ago, so I think I've used it enough to give a good review.

The Vitamin E Overnight Serum-in-Oil is new, and quite hyped-up by beauty bloggers. I liked the idea of an affordable oil, as they are usually quite expensive. It's $28.00 for 28ml, but the Body Shop almost always has deals for Buy One Get One 50% off, or Buy 2 Get One Free etc etc.

The Body Shops website describes the serum:
"Wake up to beautiful skin with new Vitamin E Overnight Serum-In-Oil, a technical innovation combining the power of a serum and oil to indulge, replenish and recharge skin with moisture overnight"
I found the serum quite difficult to use at first, because I wasn't sure of the amount I needed. I think I wasted quite a bit of product when I first tried it.
PROS:
- Does moisturize nicely
- Sits nicely under your moisturizer
- Affordable for a serum
- Doesn't test on animals
- High concentration of wheatgerm oil which can cure eczema and psoriasis, beneficial for dry skin and sensitive/sunburnt skin
- Claims to have "8 hr benefits" so that you'll wake up with better looking skin. I did find this to be the case, although it wasn't dramatic.

CONS:
- No clear directions on how to use
- The packaging isn't clear so I have no idea when I'm close to finishing the product
- The dropper picked up a lot of product, almost 4 or 5 times more than I use which could be misleading for new users
- I find the smell to be a bit offensive, reminds me of a baby smell (diaper cream or something) and while it isn't awful, it's just a bit negative for me

I hope you enjoyed my review! Have a good day! 

Friday 18 April 2014

My Go-To Wavy Hairstyle Routine

Hey everyone!

Don't get me wrong, I'm a makeup lover more than a skincare, haircare, nail care or body care lover. However, having healthy hair, nails and skin really allows makeup to enhance your features, not cover them up so I find taking the time to jazz up my entire cosmetics routine really pays off.
Today I'm featuring a hair style tutorial which is pretty unlike me and I doubt it'll happen often. I figure I should update you with my hair type so you understand how my hair behaves, adapts to products and lasts throughout the day. My hair is pretty normal in texture, it's not curly or straight, a little wavy but nothing crazy. It's almost at 'mermaid status' which I invented, meaning it's not quite the length of my boobs. When it gets that long I'm officially a mermaid. Anyway, it's pretty dead on the ends but it isn't too noticeable since I've used sulphate-free hair products for almost two years now. I've never fully dyed my hair, I got some highlights in about grade 10 (4/5 years ago) but they've pretty much grown out, leaving me with my natural dirty blonde hair. It gets more bleached in the summer but the under layers are quite dark, almost brown.
So that's a brief description of what I'm dealing with... now onto the tutorial!
 I start off with clean, damp hair. Like I mentioned before, I only use sulphate-free shampoo and conditioner, I read an article warning against sulphates once and I was suckered in. My hairdresser said more natural products has worked well on my hair though, so that's a good sign. 
 To add some texture to my hair I use Sally Hershberger's Style Primer for wavy hair. 
 It's a mousse texture and I use one pump, rub it between my palms and add it in to the lengths of my hair, avoiding the roots.
 Sally Hershberger. I bought the product for the name by the way, but on a side note this line smells amazing!!
 Next I apply the Wave Spray from the same line. It also smells amazing, so I use quite a lot.
 This I don't mind spraying into my roots as much, because it is lighter. After I've sprayed it in, I scrunch up my hair a bit and comb it through to evenly distribute the product.
 Then I section my hair into two and begin braiding. I like to do a French braid, only I braid backwards so it's called an English braid or Spanish braid or Dutch braid or whatever. 
 Then when one side is done I move over to the other side.
 Here's a little close-up shot of the braid. Nothing too neat and tidy, I like it to be a bit messy to look more natural the next day. 
 Then once my hair is braided I sleep on it and take them out in the morning. Generally when I wake up like this my boyfriend tells me I look like a lion, but I promise the mane dies down throughout the day.
Here's an action shot of me rocking the mane, as you can see it's quite tight waves here, but like I said they do die down.
Bonus! The hairstyle really lasts... here it is right out of the braids!
And the next day after brushing it out a little with my fingers

Hopefully you liked a hairstyling post, let me know if you want to see more! 

Wednesday 16 April 2014

Wet N' Wild "Walking on Eggshells" Palette Review

Hey everyone,

So today I'm reviewing a popular little palette from Wet N' Wild. I found it really hard to find in Canada, but found it at WalMart in the States. Anyway, it's really, really cheap. I think it's less than $3.00 which is amazing for the quality, pigmentation and lasting power of the eyeshadows. I was inspired to buy this years back after watching a MakeupbyTiffanyD tutorial, and so happy to finally get my hands on it! If you haven't already seen it, I also did a review of the Wet N' Wild "Comfort Zone" palette which I will link here.
 Here is the palette itself. It comes with a handy guide on the back, but since the words are printed right onto the shadows, it's a fairly self-explanatory tutorial. The eyelid shade has to be my favourite. It's great for all eye colours and although I've never been a fan of pink eyeshadow, it's such a soft shell pink that it's barely noticeable, really brightening, and shimmery enough for a day or nighttime look.
The swatches really don't do it justice but I knew I should include them. The quality of the eyeshadow it very creamy and pigmented and there isn't too much fall down when applying. They blend beautifully and really look wonderful on the eyes. I love all three shades, if anything I wish the crease shade wasn't as shimmery as it is, but it doesn't matter because it's still lovely. 

I would certainly recommend this palette, for it's price it makes an excellent everyday look and who cares if you drop it, leave it on vacation or keep one in your house, car, purse and workplace. It's incredible quality for the price and I couldn't recommend it enough! 

Thanks for reading!!